
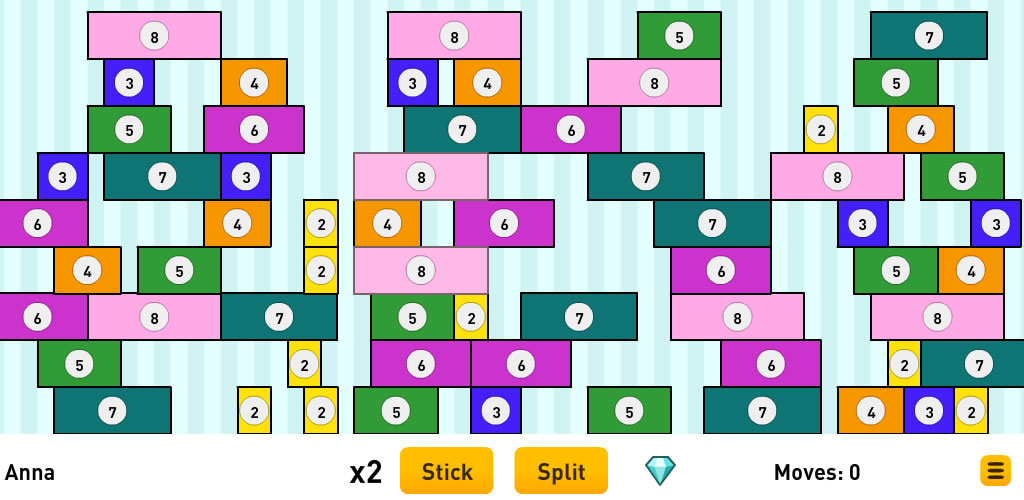
We made a game. A beautiful, simple, elegant, fascinating, motivating game. It’s called Stick and Split. Children clearly learn multiplication and division facts from playing Stick and Split. And they want to play it a lot, which means they learn lots of multiplication and division facts. We think they learn these facts in a more profound way than simply remembering 6 x 3 = 18, so it’s more likely they will be able use them in later maths questions and real life. After all, this should be the reason we teach them in the first place. This blog is about the process of how we created, (in fact it was more like ‘discovered’) Stick and Split. We think it will be interesting to teachers, mathematicians and education game developers.
But first here’s the mild rant about times tables. Don’t get us wrong, this is not some deeply held revelation that we should never teach times tables again. But children have been learning times tables for a very long time and it’s perhaps worth outlining some reasons not to learn multiplication and division facts in groups of ‘tables’.
- First, a lot of children learn tables when they are still not very familiar with number, especially bigger numbers. For instance, if they learn their 3x table before their 4x table, they’ll have to learn 3 x 9 = 27 before they learn 4 x 4 = 16. It’s very likely that 16 is a much more familiar number than 27 especially as it is double eight and is the sum of common number bonds.
- Second, learning multiplication facts in tables encourages repeated addition, and this is the very thing we’re trying to prevent by learning multiplication facts in the first place! Also repeated addition is a poor strategy for division. If a child doesn’t know the factors of 42, it’s a clumsy process of trial and error to work them out from repeated addition or subtraction.
- Third, we use multiplication facts a lot in later maths but rarely do we use times tables. If a child a few years down the road comes across a question with a 49 in it, we want them to be instantly thinking ‘I bet there’s a 7 in this somewhere’ (unless it’s a physics question, in which case we want them to think I bet g = 9.8 m/s2). They encounter number facts individually, not as consecutive multiples.
- And last, learning up to the 12x tables suggests it’s more important to learn these multiplication facts than others. Is it really more important to know 12 x 9 than 4 x 13, when children are probably more likely to encounter maths and real-life situations that involve the latter?

A different way to learn multiplication facts would be through increasing products, learning the ways to multiply to make 4, then 6, 8, 9, 12, 14, 15, 16 and so on. This way children would spend a lot of time thinking about the factors of 16 and how they relate, long before learning 3 x 7 = 21. This approach also has the advantage of easing the confusion around different questions having the same answer, for example, 3 x 8 , 2 x 12 and 6 x 4. Children would learn about 24 and how it has all these factors and how they relate, rather than encountering them as separate questions in different tables.
But all this presupposes this is a better way to learn multiplication and division facts than learning them in groups of 10 or 12. And this is where the Stick and Split game comes in. The reason we say Stick and Split was more discovered than created is that long before we started making it, we had a list of ten things it should and should not be. We then spent a long time trying to build the game that would match these criteria. Here they are:
- However children learn tables, it’s going to take a while. So the game needed to have an addictive game mechanic to keep them playing for a total of several hours, in short spells over a long period of time. We had Tetris or Candy Crush in mind.
- We knew the game must not feel like school maths, because children easily get bored. That means there could be no questions like what is 4 x 5 or 30 ÷ 6.
- Children would be able to play the game whether they knew lots of multiplication and division facts, or not. Learning such facts would help them play the game better. This would give them agency in learning: they don’t learn the facts because they’ve been told to, they learn them because the facts are useful to them.
- If a child wasn’t sure of a particular fact, we wanted the game to get them to think about it as much as possible. “Memory is the residue of thought” so the game should make them think about every multiplication and division fact, rather than expecting them to answer the same tedious questions over and over again. Ask a child “7 x 4?”, whether they know it or not, you’re not expecting them to think about it much. So it’s no wonder in traditional approaches, children are expected to answer such questions thousands of times for the memory to stick. Many give up.
- It would need to be a game with no time pressure, no jeopardy, no failure. Some children enjoy this sort of thing, but while being under pressure can be entertaining, it is rarely a good state of mind for learning maths.
- Similarly, the game would have no competitive elements. Some children thrive when competing, some don’t. If someone wins, someone loses and being a loser is seldom a great way to encourage a child to learn.
- The game would ideally be playable on a touchscreen device. A child playing the game would need to make a great many inputs and we didn’t want them to be encumbered by having to master fluent use of a mouse or keyboard first. Those are not easy skills for many young children.
- The game would cover both division and multiplication. Facts that had been mastered earlier in the game would pop back periodically and need to be recalled. We called this our Ebbinghaus Principle.
- The game would get children to focus on maths and that meant minimal distractions – no cutesy characters, no silly gimmicks or sideshows. We wanted children to concentrate on multiplication and division and little else.
- All this could lead to a very dry, dull game. Many maths games assume maths is boring, so end up about something else: answer these questions and you win something or a ball goes in a goal. But we had an inkling there was something beautiful in the maths we just had to discover. So our most important rule was the game should not be a bolt-on to the maths but instead the maths should be intrinsic to the game and the stars of the game would therefore be the maths and the child’s evolving mind.
Over the few years, we’ve developed a few games, assuming if we met most of the above criteria it would still be a worthwhile game. But it wasn’t, we had to meet them all. We’re most proud of ditching the failures, even when some have had quite a chunk of investment. In the end, the game we ‘discovered’ turned out to be wonderfully simple, like an elegant solution to a seemingly complicated maths question. It almost programmed itself. If ever a project showed the value of 99% perspiration and 1% inspiration it was this.
And why did we do it? There are few things we teach children in school that you could argue they really, really need to know and will be useful later on in real life. But a solid recall of multiplication and division facts help greatly with fractions and algebra and lots of other maths, as well as every day calculations. It is worth the time and effort of committing them to memory.
Here’s a short video of how Stick and Split is played. You’ll perhaps need to play the game, or better watch a child playing it, to fully judge how well we met all these criteria. Stick and Split is in the App Store for iPad and Google Play Store for Android Tablets. It’s the price of an expensive coffee but it will, with a bit of encouragement and support from a grown up, keep a child thinking and learning useful number facts for hours. It’s worth it for the peace and quiet alone! And if that price is too high for you, drop us a line and you can have it for free.
 iPad https://apps.apple.com/gb/app/stick-and-split/id1512738668?ls=1
Android Tablet https://play.google.com/store/apps/details?id=air.com.sunflowerlearning.tt&hl=en


